How To Configure MySQL & Deploy Your Node Js Server On AWS EC2?
Deploying a Node.js server on AWS EC2 with a MySQL database is a crucial step in scaling your applications to meet real-world demands. But, how do you configure an EC2 instance to host your Node.js application? What are the necessary steps to set up MySQL on your EC2 instance for seamless database connections? How do you prepare your Node.js environment to run efficiently in the cloud? And once everything is set up, how can you deploy and run your project on AWS, ensuring it’s production-ready and runs continuously?
In this blog, we will answer these questions by guiding you through the process of configuring an EC2 instance, setting up MySQL, installing Node.js, and deploying your Node.js project. By the end of this tutorial, you’ll have a fully functional, production-ready server running on AWS, ready to scale with your application’s needs.
Process Description
With a robust plan in place, it’s time to turn our focus to the practical steps involved in configuring and deploying your Node.js server and MySQL database on AWS EC2. Each step plays a critical role in ensuring your application runs seamlessly in a production environment. From provisioning an EC2 instance to setting up MySQL, configuring Node.js, and finally deploying your project, we’ll cover everything you need to build a reliable and scalable server setup. Let’s jump into the process and bring your application to life!
1. Configure EC2 Instance
To deploy your Node.js server on AWS EC2, the first step is to set up an EC2 instance, which will act as your server. Below are the detailed steps, including the prerequisites and instructions to get started.
Prerequisites: Ensure you have an active AWS account. If not, sign up at AWS.
The steps to launch your EC2 instance are as follows:-
- Login to AWS Management Console & under the services search for EC2 Instance & then click on EC2.
- Once you click on EC2, a new page will appear where the Launch Instance tab will be there, click on it and the EC2 instance configuration page will open.
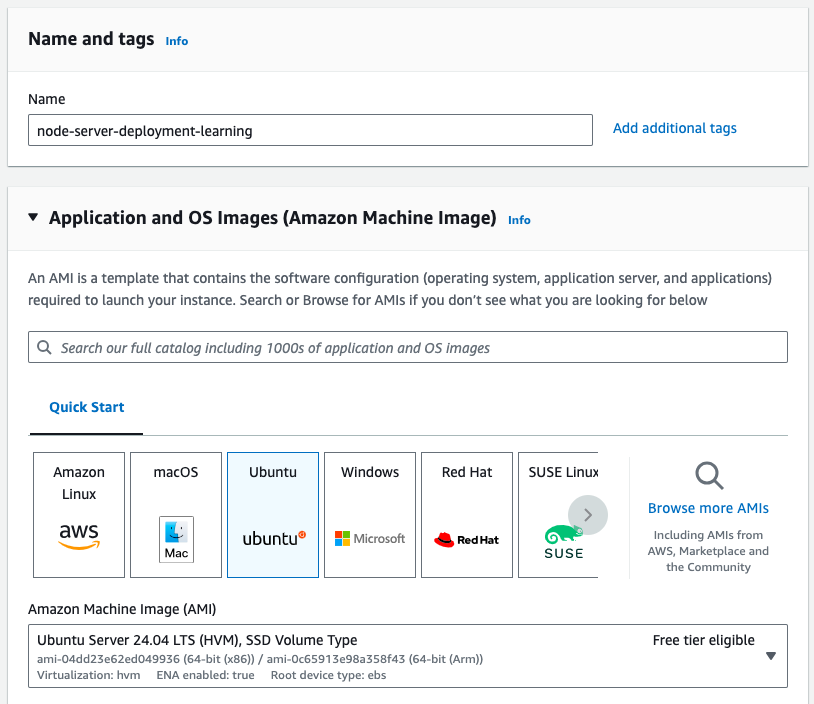
- Name your instance as node-server-deployment-learning & choose an Amazon Machine Image (AMI), Select the latest Ubuntu Server LTS or Amazon Linux 2 AMI (64-bit x86). Both are widely used and support Node.js.
- Now, the next step is to Choose an instance type based on your project requirements. For small projects, t2.micro or t3.micro is suitable (eligible for AWS Free Tier).
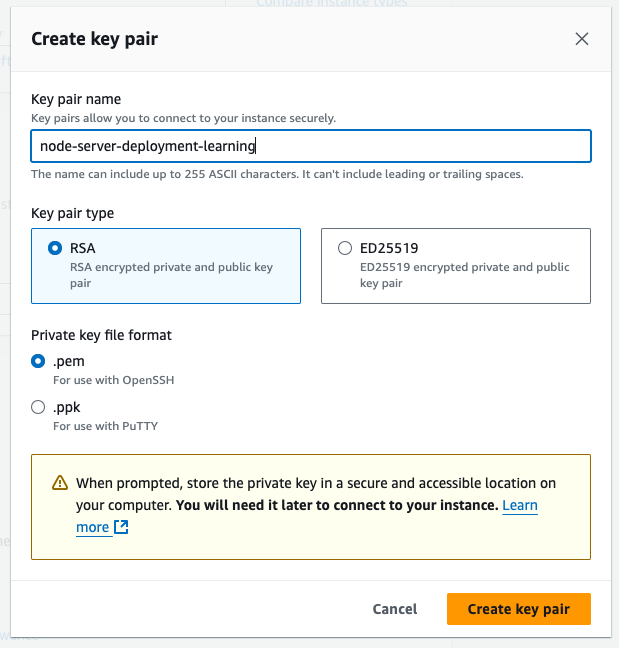
- Next step is to configure Key pair i.e. In the Key pair (login) section, create a new key pair or use an existing one. Download the private key file (.pem) and keep it secure; you’ll need it to access your server.
- Allocate storage as per your project needs. A default 8 GB is usually sufficient for basic setups.
- Now the final step is to Review and Launch, Double-check the instance configuration and click Launch Instance. Wait for the instance to be in a “running” state
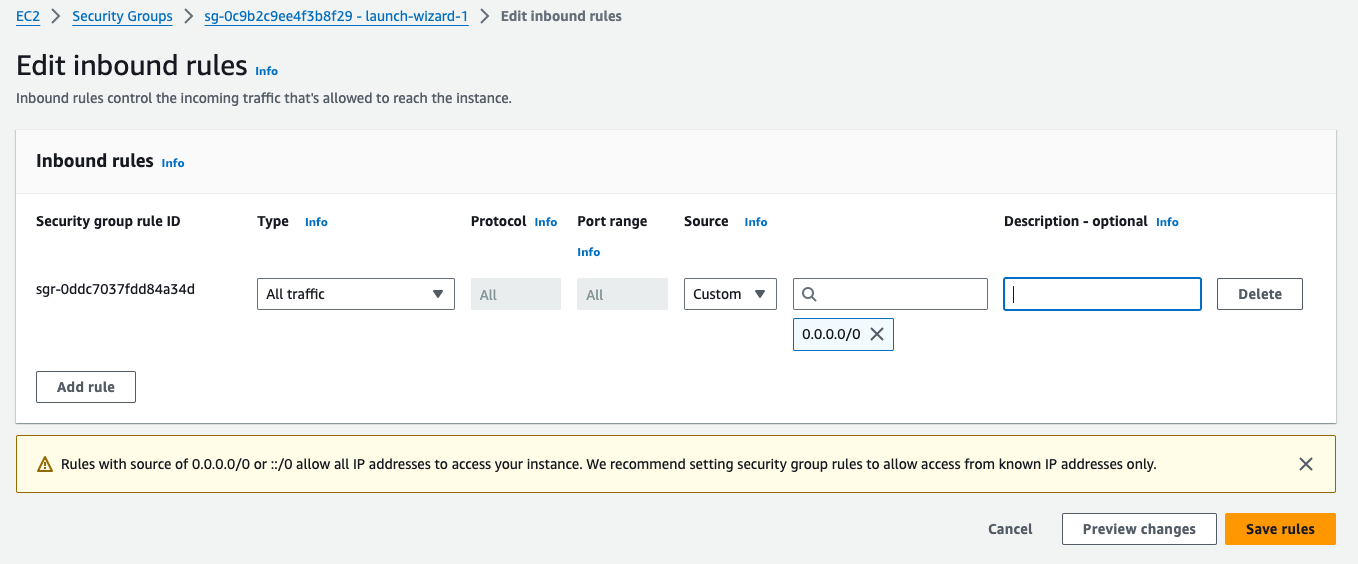
- Once your instance is up and running, select that instance and from below prompt navigate to the security tab and click security group link and edit your inbound rule, as of now allow all traffic and all ports from anywhere, but ideally you should allow the legitimate traffic and ports for security purpose. Once done click on save rules.
2. Connect to the EC2 Instance
Once your EC2 instance is running, you can connect to it in multiple ways. Below are the detailed methods to access the instance directly using EC2 Instance Connect, a .pem file via SSH, and PuTTY.
- Connect Using EC2 Instance Connect (Browser-Based)
- In the EC2 Dashboard, select your instance and click Connect at the top.
- In the Connect to instance section, select the EC2 Instance Connect (browser-based SSH) option.
- Click Connect to open a terminal directly in your browser.
- This method is quick and requires no additional setup, but it may not support advanced configurations
- Connect Using a .pem File
- Using SSH (Linux/macOS)
- Open a terminal and go to the location of your downloaded private key (your-key.pem), If you have kept naming convention mentioned above then your .pem file name will be node-server-deployment-learning.pem
- To ensure secure access, modify the permissions of your .pem file
chmod 400 your-key.pem
- Use the following command to connect, by replacing your-key.pem with the name of your private key and your-ec2-public-ip with the public IP of your instance.
ssh -i your-key.pem ubuntu@your-ec2-public-ip
- Using PuTTY (Windows)
- For putty, first you need to convert your .pem file .ppk file, for that Open PuTTYgen (installed with PuTTY), Click Load and select your .pem file, then save the file as a .ppk key using the Save private key option.
- In PuTTY, enter your Public IPv4 address under Host Name (your-ec2-public-ip) & then Go to SSH > Auth, and browse to the .ppk file.
- Click Open to establish the connection.Configure MySQL On EC2 Instance
- Using SSH (Linux/macOS)
3. Configure MySQL On EC2 Instance
After setting up your EC2 instance, the next step is to install and configure MySQL. MySQL will serve as the database backend for your application, providing a reliable and efficient way to store and manage your data. Follow these steps to install MySQL and configure it for secure and remote access.
- To ensure your system has the latest package details Update the Package Repository
sudo apt update
- Install the MySQL server package & when prompted with “Do you want to continue/Proceed?”, press Y to proceed.
sudo apt install mysql-server
- Start the MySQL service to activate the database server & also enable MySQL to start automatically at boot, once done verify the status of MySQL service and it should show actively running (Execute below command one by one)
sudo systemctl start mysql
sudo systemctl enable mysql
sudo systemctl status mysql
- Access the MySQL shell with the root user, Enter the default root password i.e. root or (leave blank if not set).
sudo mysql -u root -p
- Change the root user’s authentication method and set a secure password.
ALTER USER 'root'@'localhost' IDENTIFIED WITH mysql_native_password BY 'new_password';
exit;
- Run the security script to remove insecure defaults, During this process:
- You’ll be asked about enabling the VALIDATE PASSWORD COMPONENT. For simplicity, choose N.
- Remove anonymous users, test databases, and disable remote root login based on your needs (for a production setup, choose Y for these options but for now choose N).
sudo mysql_secure_installation
- Enable Remote Access
- Open the MySQL shell again and when prompted enter the password set above.
- Create a user that allows remote access
- Exit the shell & execute the below commands one by one to complete the above steps:
sudo mysql -u root -p
CREATE USER 'root'@'%' IDENTIFIED BY 'YOUR_PASSWORD';
GRANT ALL PRIVILEGES ON *.* TO 'root'@'%' WITH GRANT OPTION;
FLUSH PRIVILEGES;
EXIT;
- Update the MySQL Configuration File
- Open the MySQL configuration file.
sudo vim /etc/mysql/mysql.conf.d/mysqld.cnf
- Locate and modify the bind-address entry to allow external connections.
bind-address = 0.0.0.0
mysqlx-bind-address = 0.0.0.0
- Open the MySQL configuration file.
- Apply the changes by restarting the MySQL service.
sudo systemctl restart mysql
- Make sure while configuring the EC2 instance, in the security group Inbound rule you have either allowed all traffic and port, or you should specifically allow MySQL service for remote access.
- Test Remote Connection with MySQL Workbench
- Download and install MySQL Workbench if not already available in your system locally.
- Open MySQL Workbench and create a new connection:
- Hostname: Public IP of your EC2 instance
- Username: root
- Password: Enter the password set earlier.
- Once connected, you can:
- Upload a database dump file, or
- Configure your schema from scratch.
4. Create a Node.js Project Locally
To prepare for deploying your Node.js application on your EC2 instance, the first step is to create a simple Node.js project locally. This project will include a REST API and a MySQL database connection to demonstrate how to integrate and deploy services effectively.
Steps to Create a Local Node.js Project
- Open your terminal and create a new project directory
mkdir deployment-learning
cd deployment-learning
- Initialize a new Node.js project, This will create a package.json file with default configurations.
npm init -y
- Install express for creating the server and mysql for database interaction:
npm install express mysql
- In the root of your project directory, create a file named app.js with the following content:
const express = require("express");
require('./mysql.connection');

const app = express();

app.get("/", async (req, res) => {
    res.send({
        service: "Node Js Deployment Learning",
        status: "Running"
    });
});

app.listen(4000, () => {
    console.log("Server listening at port 4000");
});

module.exports = app; - In the same directory, create another file named mysql.connection.js for connecting to your MySQL database (replace the required MySQL credentials with your credentials):
const mysql = require('mysql');

const pool = mysql.createPool({
connectTimeout: 60 * 60 * 1000,
acquireTimeout: 60 * 60 * 1000,
timeout: 60 * 60 * 1000,
host: "YOUR_INSTANCE_PUBLIC_IP",
user: "root",
password: "YOUR_PASSWORD_SET_FOR_ROOT",
port: "3306",
connectionLimit: 100,
maxIdleTime: 100,
database: 'YOUR_SCHEMA_NAME',
insecureAuth: true
});

function isConnected() {
return new Promise((resolve, reject) => {
pool.getConnection((err, connection) => {
if (err) {
console.log("Error in connecting MySQL database", err);
return resolve(false);
}
connection.release();
resolve(true);
console.log("Successfully connected to MySQL database");
});
});
}

isConnected();

module.exports = { isConnected }; - Start the server
node app.js
- Open your browser or a tool like Postman and visit http://localhost:4000/ & You should see the following response.
{
"service": "Node Js Deployment Learning",
"status": "Running"
}
5. Create a ZIP File of Your Project and Upload to EC2
Now that your Node.js project is ready, the next step is to package it into a ZIP file and upload it to your EC2 instance. Below are the steps to accomplish this, using both WinSCP (for Windows users) and SCP command (for Linux/macOS users).
- Create a ZIP File of Your Node.js Project
- Open the terminal and Navigate to your project directory folder where app.js, mysql.connection.js, and package.json are located.
cd /path/to/your/deployment-learning
- Run the following command to create a zip archive of your project folder:
zip -r deployment-learning.zip .
This will create a ZIP file named deployment-learning.zip containing all files in the current directory.
- Open the terminal and Navigate to your project directory folder where app.js, mysql.connection.js, and package.json are located.
- Upload the Zip File to EC2
- Using WinSCP (For Windows Users)
- If you don’t have WinSCP, download and install it from the official website
- Open WinSCP and Set Up the Connection
- Host Name: Enter your EC2 instance’s public IP address.
- Port Number: 22
- User Name: ubuntu (for Ubuntu EC2 instances) or the appropriate username for your AMI.
- Password/Private Key: Use your .pem private key file for SSH connection.
- To configure the private key, click on Advanced, go to SSH > Authentication, and browse to the .pem file.
- Click Login to establish the connection. If prompted to accept the host key, click Yes.
- After logging in, navigate to the directory where you want to upload your project (e.g., /home/ubuntu).
- On the left side (local), find the deployment-learning.zip file you created. On the right side (remote), navigate to the directory where you want to upload. Drag and drop the deployment-learning.zip file from left to right.
- Using SCP (For Linux/macOS Users)
- Open Terminal on Your Local Machine & Navigate to the directory containing the deployment-learning.zip file
- Use the following scp command to upload the zip file to your EC2 instance. Replace the placeholders with the appropriate values:
scp -i /path/to/your/pem-file.pem nodejs-deployment.zip ubuntu@YOUR_EC2_PUBLIC_IP:/home/ubuntu
- /path/to/your/pem-file.pem: Path to your EC2 .pem private key file.
- YOUR_EC2_PUBLIC_IP: Public IP address of your EC2 instance.
- /home/ubuntu: The directory on the EC2 instance where the file should be uploaded.
- Using WinSCP (For Windows Users)
6. Deploy Node.js Project on EC2
Now that you’ve uploaded the project to your EC2 instance, the final step is to deploy the Node.js application and make it run continuously. Follow these steps to configure Node.js, install dependencies, and set up the project to run permanently using forever.
- Configure Node.js and NPM on EC2
- Run the following command to update the package list
sudo apt update
- Install Node.js LTS (Long Term Support) version.
curl -fsSL https://deb.nodesource.com/setup_lts.x | sudo -E bash -
sudo apt install -y nodejs - Check if Node.js and NPM are installed correctly
node -v
npm -v
- Run the following command to update the package list
- Install Unzip and Extract Project Files
- Install unzip on your EC2 instance
sudo apt install unzip
- Unzip the previously uploaded deployment-learning.zip file
unzip nodejs-deployment.zip -d node-mysql-deployment-learning
- Install unzip on your EC2 instance
- Run & Test the Project
- Move into the extracted project folder
cd node-mysql-deployment-learning
- Before running the application, install the required Node.js dependencies listed in the package.json file
npm install
- Test whether the application runs properly by executing
node app.js
- Open your browser and visit your EC2 instance’s public IP address at port 4000 (e.g., http://YOUR_EC2_PUBLIC_IP:4000). You should see the following output:
{ "service": "Node Js Deployment Learning", "status": "Running" } - Stop the server if it is successful and navigate to the home directory using
control + c
cd ..
- Move into the extracted project folder
- Run the Server Permanently Using Forever
To ensure your Node.js application runs continuously even after the EC2 instance restarts or if the terminal is closed, you can use forever, a tool that keeps Node.js apps running in the background.- Run the following command to install forever
sudo npm install -g forever
- Verify that forever is installed successfully
forever --version
- Move into the extracted project folder
cd node-mysql-deployment-learning
- Use forever to start your Node.js application
forever start app.js
- To check if the application is running, use the following command
forever list
This will list all running instances managed by forever - You can view the logs of the application to check for any errors or status by opening the log file:
vim <path_to_log_file>
- Run the following command to install forever
Your Node.js application is now deployed and running permanently on your EC2 instance. It will continue running in the background, even if you close the SSH session. You can manage it using the forever commands.
Conclusion
In this blog, we’ve covered the essential steps to configure a MySQL database and deploy a Node.js application on an AWS EC2 instance. By setting up the EC2 instance, configuring MySQL, and ensuring that the Node.js app runs smoothly using forever, you’ve learned how to deploy a production-ready Node.js application on the cloud. Whether you’re running a simple service or a full-fledged application, AWS EC2 offers the flexibility and scalability needed for your deployment. Now that your application is up and running, you can focus on scaling, monitoring, and optimizing it to meet your needs. Keep exploring the power of cloud technologies and Node.js to build robust, scalable applications.


